Concept:
A drawing needs to contain certain information. Most drawings will show you what the object is (as clearly as possible) but won't tell you everything unless you dimension it. Would you agree to buy a house just by looking at the floor plan if it wasn't dimensioned? Would manufacturers know how to build your product if you didn't dimension it? You can see how important it is that a drawing used to convey information must have clear, accurate dimensions.
In previous lessons, you have done some dimensioning (first was Lesson 1-8). To continue with this lesson, you should at least have a good concept of basic dimensioning.
There are many ways to dimension a drawing, each drafting discipline has it own set of "rules". For example, a drawing of a gear would use a different style of dimensioning than that of a subdivision. My background is in mechanical drafting, so I use that discipline as an example of how to work with setting your dimensions to work with your drawing.
Below is an example of how a drawing can be dimensioned:

As you can see, on a simple drawing like this one, only 8 dimensions are needed to convey all the information about the size and shape of the object. With a little more information you can have everything you need to build it. This is the default style you get with the AutoCAD template.
Below shows the same drawing, but with added tolerances and note about what the object is made out of.

The changes in the dimensions above were done easily using the DDIM command. This command opens a dialog box for changing the parameters of your dimensions. In this example, the text style was also changed.
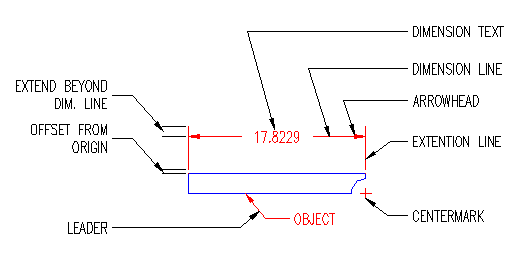
The great thing about AutoCAD is that it is very versatile. In the case of dimensions, you can modify any component that is part of it. Below are the names of various parts of a dimension:

Also, you can modify the dimension text dramatically, here are some examples:
 : :
The Dimension Style Manager
So now that you have seen what can do - how do you do it? All options are available in the DDIM (Dimension Style Manager) dialog box.

On the left is current style for working with (highlighted in blue).
In this lesson, you will create a new Dimension Style and use it in a drawing. From there, you should try different styles and get familiar with the options. Most companies these days will have a standard style (or set of styles) to use on drawings, but this is a very important tool to know if you want to turn out professional looking drawings.
Start but invoking the DDIM command and press the NEW button to open the small dialog for entering the name of the style you are creating. In this example I used the name "DIMSTYLE 1".

Make sure that "Start with" has "Standard" as its setting. Press the Continue Button when everything is set. This will open the dialog box for settings, so just press OK to close it for now.
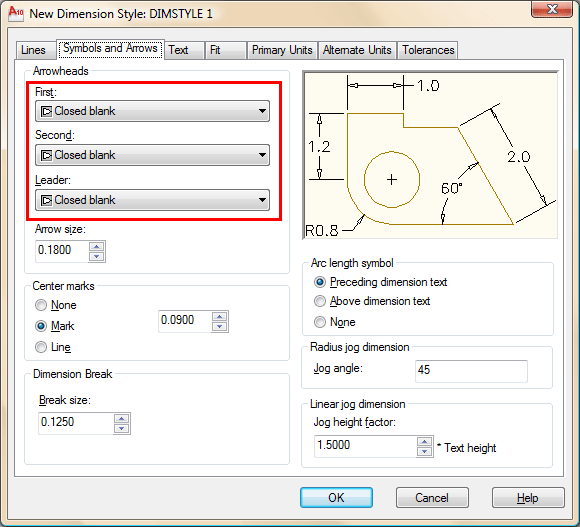
Back at the "Dimension Style Manager" dialog box, you will see that the new style you created is listed at the top (left side). To modify it, select the name, then press the modify button. The dialog box opens and click on the second tab (Symbols and Arrows).

As a general rule, I recommend not change much on this tab - especially when you're learning. Set as defaults, the dimensions are sized proportionately, if you change the setting on one parameter, your dimension can look 'off-balance'. For example, you could end up with huge arrows and small text. For the purposes of this lesson, the only thing that will change on this tab is the arrowheads. Select something other than the standard. You'll also see that you can set the colors, but just like regular objects, it's best to leave them set to "Bylayer" - and make sure you have a separate layer for all dimensions.
Go to the third tab (Text).
Start up the Text Styles dialog box by pressing the button with the ... next to the text name. Create a new textstyle using RomanS and a width of 0.8 and call it "DIMTEXT". (For more info, see Lesson 1-8.) Close the Text Styles dialog box. Select DIMTEXT as your text for dimensions as shown.
The great thing about this dialog box is that it shows you a preview of what your changes will do the final dimension in the top right window. In the bottom right, select ISO as the Text Alignment option. Try some other changes to see their effects in the preview, then end with the settings as shown below:

So far you haven't changed much, but you've seen the options available in just 2 tabs. Click on the next tab to continue.
As a rule, I leave this tab alone. AutoCAD does a good job of placing and fitting dimension where I want them. If I don't agree, I usually just use grips to edit the placement. Click on the next tab (Primary Units) to continue.
In the Primary Units, you find some of the more common parameters that need to be changed. Precision is very important. First off, you usually don't need to show 4 decimal places. If you do show 4 decimals places and send your drawing off to the machinist, you are asking him to manufacture the part to within 1/10000 of a unit - which can be a very expensive mistake. 3 Decimal places is usually enough - or less for rougher jobs.
Also, I have added a couple of other changes; adding trailing zeros and a suffix denoting the units. Note how angular dimensions have a separate section - make sure you don't neglect them.

Make the changes you see above and check the preview after each change. In this tab, you can also set the overall scale of your dimensions. This can also be done using the DIMSCALE command.
Using the DIMSCALE setting
If you have dimensions on your drawing that are either too large, or too small, use the DIMSCALE setting to make scale them. If your DIMSCALE is currently set to "1", you can make the dimensions larger by entering larger numbers. For example, enter 12 will make your dims 12 times large than they were at "1". This does not enlarge the value of the dimension, just the size of the dimension.
To make your dimensions smaller, you can also enter fractions or decimal numbers like ".5".
These numbers are all based from the standard sizes set in your DDIM dialog box. For example, if you enter "12" to make them larger, entering 1/2 later will not make them scale to "6". After changing the DIMSCALE, all new dimensions will use this scale.
Using DIMSCALE is important to make sure that people can easily read your drawings. Set your DIMSCALE before adding all of your dimensions.
After changing the scale, you will not see a change. You will need to update the dimensions. Follow these steps:
Command: DIMSCALE
Enter new value for DIMSCALE <1.0000>: 12
Command: DIM
Dim: UPDATE
Select objects: ALL
2 found
Select objects: <ENTER>
Press <ESC> twice to exit the Dim prompt. |
The next tab (alternate units) is used if you want to display two different units in your dimension. For example, you can draw your drawing in imperial inches, then dimension with inches as your primary units and add the alternate units behind. Skip this tab for now and go on to the last tab (Tolerances).
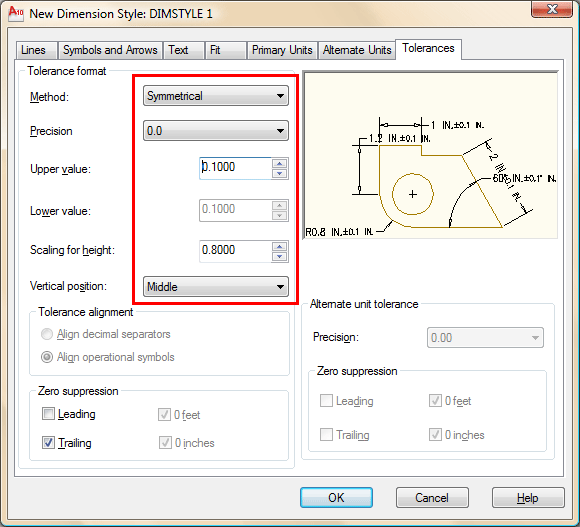
In this example, you will set the tolerances to be +/- .05 units and display them at 80% of the primary units. Sound easy? It is. Look at the image below to see how this is done.

Once again - preview shows you how it will turn out. Click OK to close the dialog box. At the original Dimension Style Manger, press the name of your new style, then click the "Make Current" button. Close the dialog box to go back to your workspace.
Draw the wedge shape at the top of the less and dimension it using your new Dimension Style. It should look something like this:

Now you have the basic understanding of how dimensions work, you can experiment and work with other styles.
Here are some common rules about dimensioning:
-
Keep them on a separate layer.
-
Dimension towards the end of your project or you could be moving them as you add more objects.
-
Use your Osnaps and confirm what you are snapping to.
-
Assign them a unique colour in the drawing, and use that colour in all of your drawings to make it easier to identify dimensions (especially when zoomed in close)
-
After you create your first dimension, AutoCAD creates a new layer called "DEFPOINTS". This is used only for the small points you see at the end of an extension line. This layer will not print - so be sure not to draw on it.
-
Keep even spacing between you dimensions and between your dimension and your object lines. Use DDE while placing dims.
-
Try not over lap lines (either object or dimension).
-
Use enough dimensions to make sure that all measurements are there - one dimension left out can hold up a project.
-
Try to keep dimensions outside of the objects you are dimensioning.
-
For clarity, don't over-dimension.
-
If you need to override one dimension (perhaps a unique suffix), you can change it in the properties (select > right click > properties)
Dimensioning in Layouts
If you are familiar with Layouts (or Paper Space) as shown in Lesson 2-4, you can continue with this lesson which will explain dimensioning in Layouts.
Using the same wedge shape from above, delete your dimensions and then scale the wedge up by 24X.
Go into your Layout and use a zoom factor factor of 1/12xp for your viewport.
Start dimensioning your lines. AutoCAD now does a great job of dimensioning in Layouts. It will recognize the scale of the viewport and find the correct size of the object you are dimensioning.
I recommend doing all of your dimensioning in you Layouts. There are a few reasons for this:
-
It leaves your model space free of dimensions
-
For 3D objects, this system is MUCH easier.
-
You only need one size of dimensions for full view and details.
-
You can add your title block, notes and dimensions in one area.
I hope that this lesson has given you the ability to create professional, accurate dimensions. Like everything else in AutoCAD, practice make perfect.
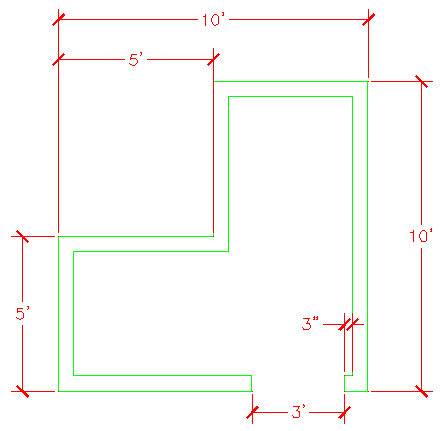
For more practice, create a simple floor plan and create a dimension style using Architectural units and 'ticks' instead of arrows. Use a precision of 1/2". Here's a very simple Architectural drawing using this style.

|