When you have been drawing in AutoCAD during these tutorials, almost all of the lines
have been continuous. This is a particular linetype.
Most simple drawings can be drawn with just this one
linetype. More advanced drawings will require different
linetypes such as center lines, hidden lines, phantom
lines and others.
When you first start AutoCAD, the default template has only one linetype is available.
This is the continuous linetype. AutoCAD has many more
available, but only loads in one to start with in order
to keep the drawing file size smaller. If you need a
different linetype, you must load it into your
current drawing. As is usually the case in AutoCAD, there
are a few ways to do this.
Command |
Keystroke |
Location |
Result |
Linetype |
LINETYPE / LT |
Home > Properties
>
Linetype |
Opens the LINETYPE dialog box |
Linetype scale |
LTSCALE / LTS |
None |
Allows you to set the linetype scale globally. |
Lineweight |
LINEWEIGHT / LW |
None |
Set line weight globally |
Invoking the LINETYPE command
brings up the Linetype Manager dialog box as shown below.

You'll notice that it is similar to the layer dialog box.
Instead of creating a new linetype (like you would a layer),
you will have to LOAD it into your drawing. AutoCAD has
many different linetypes that you can load, as well as
giving you the option to create your own. (This will not
be covered in this lesson.) To load a linetype, press the Load... button that is towards the top-right corner. When you do
this, you'll see another dialog box appear (shown above).
Notice that AutoCAD is giving you a choice of different linetypes
as defined in the acad.lin file. Scroll through
the list to see what options you have available. You'll
see the most common ones (hidden, center, etc) as well
as some that are only for certain applications. Click
on the Hidden linetype and then press OK.
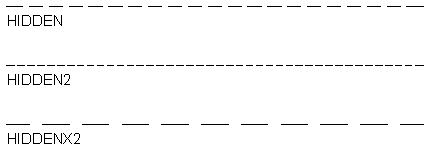
Adding a linetype to your drawing is that
easy. Notice that there are three different hidden linetype
options: HIDDEN, HIDDEN2, HIDDENX2. All of these are valid
linetypes, but as you can see from the samples shown in
the right side of the dialog box, they are slightly different.
Which one you choose is up to you. Remember one thing
though. If you pick HIDDEN2, then you should also
pick CENTER2, if you need a center line. This will keep
your linetype scale consistent. Only change your
linetype scale singly if you have a specific reason
to.
Here is an example of 3 different linetypes:
LINETYPE SCALE
Your linetype scale determines how the linetype is displayed
and plotted. Depending on your linetype or original area
you set up, you may have to change it. This is one more
reason, why you should set up your drawing properly from
the beginning. If you need to change your linetype scale,
type in LTSCALE and try
different values to get the look you want. You can also
change you linetype scale from the LINETYPE dialog box
by changing the value in the Global Scale Factor box.

Note: you can change
the linetype scale separately on each object, but this
is not recommended as it can be very difficult to keep
track of, and therefore lose consistency.
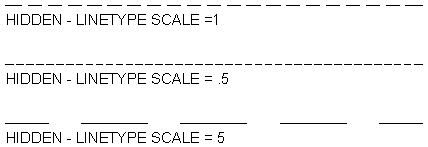
Here is a single linetype (hidden) with 3 different linetype
scales applied. Notice that the line with a LTS of .5
has lines and dashes that are 1/2 the size of line above
it. The line with a LTS of 5 has lines and dashes that
are 5 times longer.
You can change the linetype of an object by changing its
properties, or use the droplist of layers on the main drawing
screen. This is a simpler, quicker method - just select the
object, then pick the linetype from the list.

Linetypes can also be controlled by putting them all one
layer and using the ByLayer option. For example, you could have all of your hidden lines on one layer so you can turn them off all at once or give them a light lineweight.
LINEWEIGHTS
Another property of lines is their lineweight, or how wide
they display on the screen and when printed. One common example
of a heavier lineweight would be a border around a title
block. Some times, you may use a lighter lineweight for hatching.
But whatever you use them for, they are powerful display
options.
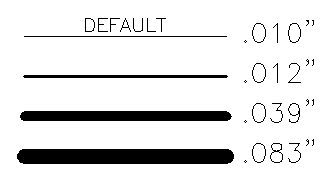
Here are the range of lineweights available (There are more
options in between):
The methods for changing the lineweight for
objects is similar to the ones for linetypes (above). There
is also the option of turning the lineweight display on or
off. Just click on the LWT icon of the status bar. Below the icon indicates that lineweights are shown in the drawing.

Type in LW to
access the Lineweight Settings Dialog box.
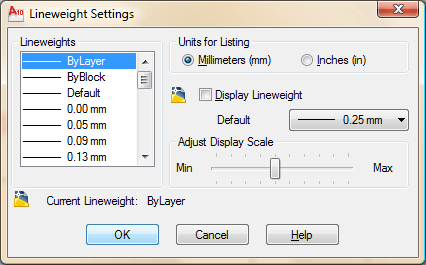
The options are quite straightforward, but
you also have the option of displaying lineweights or now
(Display Lineweight) and changing the default display lineweight.
By working with different linetypes and lineweights you can make a drawing clearer. Some people will make their objects have a heavier lineweight than the dimensions to make them stand out better.

Extra Practice: Make an isometric drawing that uses a heavier lineweight for the main objects and a lighter lineweight for hidden lines.
 RETURN
TO THE TOP OF THE LESSON | RETURN TO THE TABLE OF CONTENTS RETURN
TO THE TOP OF THE LESSON | RETURN TO THE TABLE OF CONTENTS
CONTINUE TO THE NEXT LESSON - 4-4 >
|

