By now you should be familiar with grips. These are the ‘blue
squares' that get highlighted when you select an object
outside of a command.

Grips are handles that allow you
to manipulate the object without entering a command
directly. Be aware that grip editing can lead to undesired
results if you are not careful.
The
look of your grips can be changed by entering the DDGRIPS command.
You'll see this dialog box (it's the Options dialog box:
Selection tab):

Notice that you can enable or disable grips, as well as control
whether they are enabled within blocks or not.
You can change the colors so that they are more visible depending
on the particular drawing or background color you are
working in. You can also change the size of the grip if
you need.
Notice that there are two different colors for grips, one when
they are unselected (but visible) and another color when
they are selected, or hot.
Usually these settings do not need to be changed.
When you first start working with grip editing, I recommend
that you use it for modifying your dimensions. This is
an easy way to get started, as it won't affect your geometry.
Once you have mastered grip editing with dimensions, try editing
your geometry and you'll find that in many cases this
can be quicker and easier than using the regular AutoCAD
commands.
When you first select a grip and make it hot, it turns red
and you are able to stretch it to where you need it to
go. Always read your command line when grip editing.
Command: <select
an object>
**
STRETCH **
<Stretch
to point>/Base point/Copy/Undo/eXit:
You'll see that there are few options, ignore these for now
and try the stretch option. You can now move that point
anywhere and snap to any Osnap that you have active.
This can be a quick easy way to connect lines rather
than extend them. Once you have made your modification,
press the escape key to deselect the grips. (Pressing
the enter key will repeat the last command, which you
don't want to do). You may have to press escape a few
times to totally deselect the object.
The stretch option is only the first of several commands
that you have available for grip editing. By pressing
the space bar, you will be able to cycle through
all available options for grip editing.
Command:<select
an object>
**
STRETCH **
<Stretch
to point>/Base point/Copy/Undo/eXit: <Space Bar>
**
MOVE **
<Move
to point>/Base point/Copy/Undo/eXit: <Space Bar>
**
ROTATE **
<Rotation
angle>/Base point/Copy/Undo/Reference/eXit: <Space Bar>
**
SCALE **
<Scale
factor>/Base point/Copy/Undo/Reference/eXit: <Space Bar>
**
MIRROR **
<Second
point>/Base point/Copy/Undo/eXit:
The previous lines of text show what the command line would
look like as you cycle through the options.
To use any of these options, you should
be very comfortable
using the regular commands first.
You'll notice that these other options work a bit differently
than the stretch option. If you have many objects selected,
you can stretch one point, but can move all the objects
highlighted with grip editing. This applies to the rotate,
scale and mirror options as well.
Different objects have different grips available to them. A line
has 3 grips: 2 endpoints and a midpoint. You can stretch
the endpoints, but if you ‘stretch' the midpoint, you
move the line. You can stretch quadrants of a circle
to change the radius, but stretching the center grip
will move the circle. Single line text has one or two
grips depending on the justification used. You can use
their grips to align the text.
 |
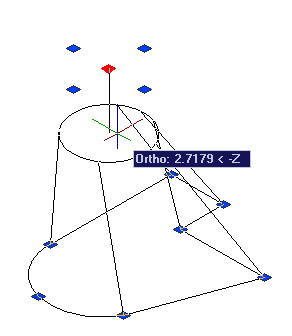
You can also use grips to adjust points in 3D objects. Just like a 2D object, select the solid with no commands are currently running and the grips will appear. You can then stretch grips to new points, giving you more power when editing solids.
In the example on the left, the Center grip was used to shorten the 3D solid. |
In review, if you can master grips, you will be able to be much quicker at editing your drawing. In many cases you will want to make sure your Osnaps are on, to snap the grip to the correct location.
|