AutoCAD has a few ways for you to view an object other than the
plan view that you have used for your 2-D drawings.
For quick, easy views use the pull-down
menu options. To do this choose View > 3-D
Viewpoint > (then select one of the four
bottom isometric options). Look at the drawing
below to see the differences between four views. When
doing basic drawings, it is a good idea to use only one
view. This will keep you orientated a lot easier. It
is most common to use the Southwest view,
as this keeps your positive X and Y axes in a logical
position. For most of your work in this course, stick
with this view. 
There will be times when you may need to see around to the
other side of your object. Then you can easily use the other preset views to see your
model. You can also have more than one view on your screen
at a time.
To achieve this, use the Tiled Viewports  option
of the View pull-down menu. Then choose
the New Viewports tab, and pick from several layouts.
Any view or viewport configuration can be saved under
a unique name. Later you can easily restore this view
when needed. Here are the preset viewport configurations
that you can use in model space. option
of the View pull-down menu. Then choose
the New Viewports tab, and pick from several layouts.
Any view or viewport configuration can be saved under
a unique name. Later you can easily restore this view
when needed. Here are the preset viewport configurations
that you can use in model space.

As you can see, you can select options for 2D or 3D, and
change the view by picking in one of the viewports and
selecting a new view in the droplist. Note that I have hidden the ribbon by clicking the button to right of the ribbon.
Here are a few general notes about views and viewports:
-
You can have viewports in either model space (tiled)
or paper space (floating).
-
They can have different zoom ratios.
-
There is a difference between views and viewports.
-
If you go to a lot of work to get a view you need, save
it using the VIEW command.
-
When saving a view, give it a descriptive name.
-
Keep an eye on the UCS icon in the corner of the screen
or viewport.
-
The smaller your monitor is, the harder it is to see tiled
viewports.
-
When you have more than one viewport, click inside the one
you want active.
To practice viewing your 3D drawing, open
up up this sample 3D file of a table
and chairs. Change to different viewport layouts as shown above. Try
some of the different Isometric views. Depending upon the
size of your monitor, it may not be practical to use multiple
viewports. In the end it is a matter of personal preference
that decides what setup you are comfortable drawing in.
Change back to 1 viewport (View > Set Viewports
> Single) and switch to the SW Isometric view.

PERSPECTIVE VIEWS
There
is another command called DVIEW (Dynamic
View) that gives you more control over the view of your
object. It will also allow you to see a perspective view
of your model. This can be a very confusing method if
you don't have a system. What follows is my approach
to creating perspective views.
The basis of generating a perspective view is to have
a virtual camera and target. Think of where you would like
to 'stand' (the camera) and what direction you want to
look at (the target).
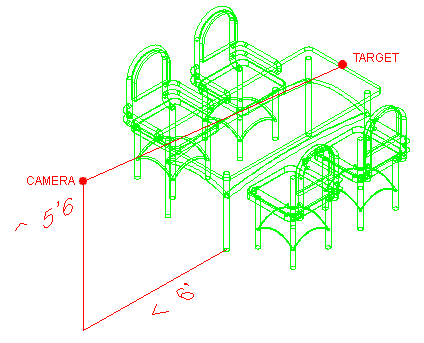
In this example, I want a view that gives me slight perspective
view of the table and chairs. The first thing I need to
do is draw a point for my camera location.
Draw a line from the centre of the bottom leg 6' in the
negative X axis. Now draw a line 5'6" straight up (@0,0,5'6)
- and finally draw a line to the middle of the far end of
the table. It should look like this:

Now start the Dview command. You
will be asked to select objects. You can select everything,
or for the purposes of setting points, I would normally
just choose the line as it makes the command faster in
large drawings.
Select the top line to the middle of the table. <ENTER>
Choose the POints option by typing in PO <ENTER>
Now you have to select the Target - pick the right endpoint
of the line (use Osnaps)
Next select the Camera - pick the left endpoint of the
line.
It will look like the line disappeared, but you now looking
straight down it.
Press <ENTER> to end the command.
Start the DVIEW command again
and select all the objects. In larger drawings, select
the objects that are furthest to the extents of the drawing
(this will save time and let you know the limits of your
view) and any objects that are critical to your view. What this means in that if you are using the command
on a very large drawing, the DVIEW command can bog down
(slow down) your system to a crawl. By selecting only the
ones on the outside limits of your drawing, you will still
be able to use the command quickly and efficiently.
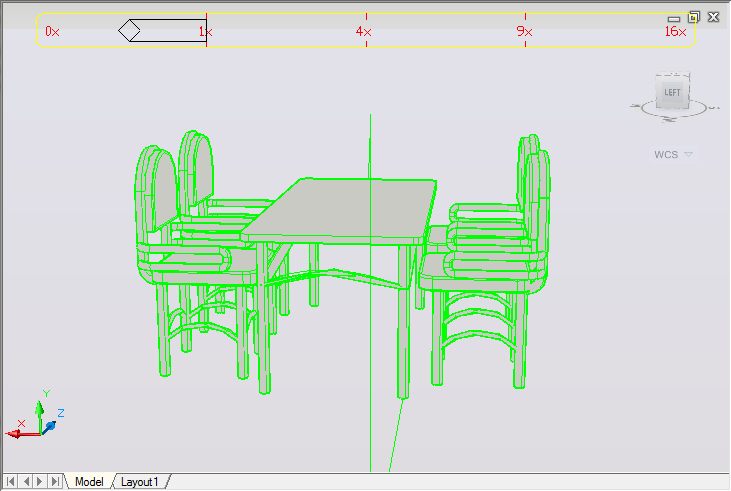
This time, choose the Distance option by pressing D <ENTER>. This
option effectively zooms in and out while in a perspective
dynamic view. Move the slider at the top until it is just right of the
'1x' and then left click with your mouse. Note that slower computers will take longer to regenerate
the drawing for you. You can also enter distances manually on the command line - try this out as well. Each 3D model will require different settings to get the view you want.

While still in the Dview command, type in PA for the Pan option and move the table and chairs up
slightly in the drawing area so that they are centered.
And lastly, type in H for the hide option
for a more realistic view. and then press <ENTER>.
You will notice that certain commands do
not function while in a perspective view. For example,
you can not zoom or pan the usual way. I recommend that you
don't edit your drawing in this view.
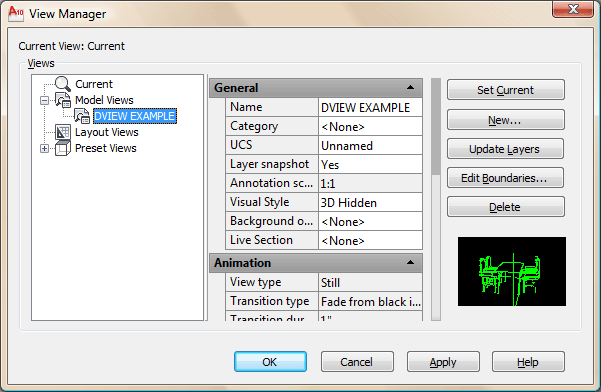
To preserve this view that you worked
so hard to achieve, type in V (for
view) and select the New button and give your view a name.
Now when you need to go back to this view you just type
in V again, select your named view, press the Set Current
button and press OK.

If you are using this command on larger
drawings, like a home or building, the same process is
used, but you should create the camera location to be further away from the objects you want to view.
Practice makes perfect and this command can take some trial
and error sometimes to get it just right. In the end, it
is a very powerful viewing tool. When practicing, save views so you can go back to them if needed - it will save you a lot of time.
|