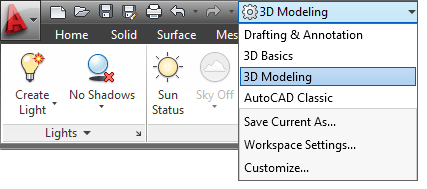
For the next few lessons, you should switch to the 3D modeling workspace. Look for the menu in the top left of the AutoCAD screen. Older versions may have this in the bottom right. You should also have your Ribbon in view if you don't already as there are many commands that are easier to access this way instead of via the command line.

One
of the more interesting aspects of working in 3-D is
that you can visualize what your design will look like.
You have so far used the hide and shade commands to give
you some idea towards how the final piece will look.
The next step is to learn about the RENDER command.
This command is the most powerful one for viewing your
objects. Using render, you are able to add realistic
lighting and materials to get the most realistic view
of what you're designing.
You
can render objects that don't have materials applied
to them, but it won't look as realistic as if you have
material added.
The
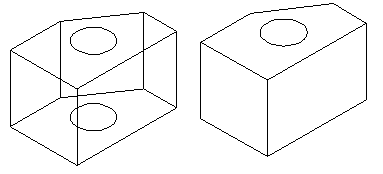
first two blocks shown here are examples of the usual
wire-frame view before and after the HIDE command.

These
two blocks show how the render command can show the object
two ways. The block on the left was rendered without
a material applied, while the one on the right has a
white ash material applied.

Applying
the materials is a relatively easy process, getting them
to look exactly the way you want them to can be a skill
in itself. Once the materials are added, getting the
lights and shadows to look realistic is another task
that many people prefer to complete in a program other
than AutoCAD, although AutoCAD is getting better at this with each release.
Follow
these steps to get an basic, accurate rendering:
Once
your objects are drawn, you have to decide which materials
you want to use. AutoCAD comes with a basic materials
library that you can use to apply to your objects. This may have been an option when you installed the program, and this tutorial will assume that you have them. If you don't have them, jump ahead to the tutorial about creating materials and come back - I'll wait.
Later lessons will teach you how to create new materials and map them to objects. This lesson is designed to allow you to quickly and easily apply materials to your objects.
Start by drawing a basic cube 20x20x20 - this will be your object for testing materials. Go to the Ribbon and find button for Render (shown below). This will give you a new set of tools to work with for visualization.

Now that you have your object (the cube) and a list of materials, you're ready to go.
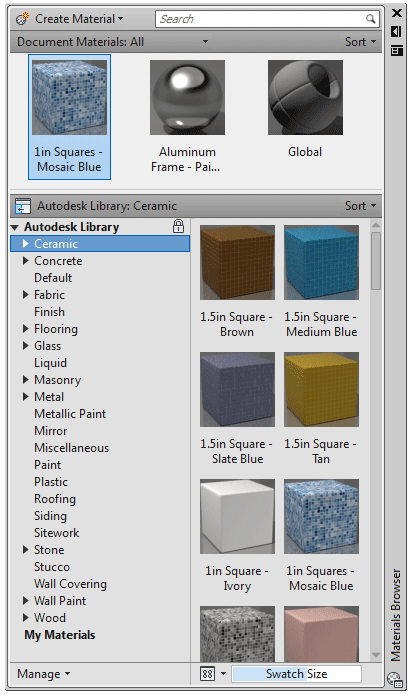
Type in RMAT (Render MATerials) and you'll see the materials palette appear. If your materials are installed, you just click through the menu and see preview of each material. This is a great interface. If you click on the preview icon, it will move it to the top active materials section at the top. Now you're ready to go.
Materials Palette for AutoCAD 2012 |
 |
So now you have your cube and your material. Just click on the cube so that it is highlighted and then select the material in top "active materials" or one of the preview images.
If all went well, then it should look like nothing happened. Isn't CAD wonderful? But now it is time to render the scene.
BASIC RENDERING
There are few ways to render, and for this exercise I will suggest this method. Look at the Render Ribbon again and under the "Materials Browser" button, you'll see this:

Choose the third option that you see highlighted above and you'll see the material that you selected rendered onto your screen. Now this is only a basic rendering that you would use for previewing your material. You would also use this viewing method for mapping the material (see tutorial 3-13).
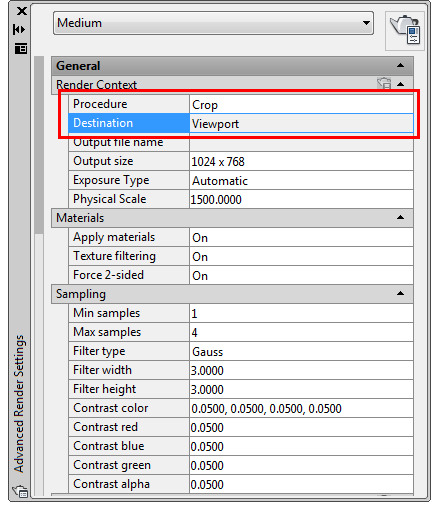
Now we're going to go for a more realistic rendering using the RENDER command. First fine the Render area of the ribbon and look for the small arrow on the bottom right:

Picking on this small arrow will open and close your Render Setting Palette which is shown below:

As you can see there are a lot of options in this palette, but for now I want to look at the two that are boxed in red. These settings allow you to crop to an area and then render the scene in your viewport. We'll look at more options in tutorial 3-17.
So now you can type in the RENDER command, crop to an area in your viewport and press <Enter>. This will render the scene with your chosen materials. If all went well, you might have something like the image shown below.

This has just been an introduction to the rendering process. As you can see adding materials isn't needed unless you plan on rendering the scene. Using just the example above, you can get a nice looking presentation done using only a few simple steps. Next you would need to add lights, shadows and possibly custom materials. For me, this where AutoCAD gets fun and makes up for the steep learning curve when starting out.
Extra Practice: Add materials to any of the objects you created in Lessons 3-6, 3-7, 3-7a.
|