One of the things that every drawing needs is a title block. This provides vital information about the drawing when it is printed. Some of the data that makes up a title block is who draw it, what day it was published, revision number, etc. Every drawing at the professional level will have one. For those that aren't familiar with the term, here is sample one below that is included with AutoCAD.

The title block for this exercise will be designed for an 11"x17" sheet. If you want to make it smaller to fit an 8-1/2"x11" sheet, adjust it as needed. You should be familiar with blocks and attributes before continuing.
Start by drawing a rectangle 16.25" x 10.25. This will give you .375 space on all four sides.
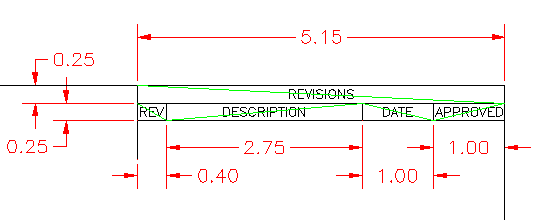
Copy the section below into the top right corner of the title bar. This area is used for tracking revisions.

The green lines are used to create reference points for your text. They had a midpoint that is used for positioning Middle-Centre text. For this section, text is RomanS, 0.125" tall and Middle-Centre justified.
Now draw the bottom right section of the title block. Here is a link to a larger image with the details:
Bottom right corner of the title block detail: tb_bottom.gif. The text is 0.065" tall.
Now comes the fun part, adding the attributes. Use this image as a reference for the positioning of the attributes, and the table below for the contents. You will want to create text styles for the different text below.
TAG |
PROMPT |
DEFAULT VALUE |
FONT |
HEIGHT |
JUSTIFY |
PROJECT |
What PROJECT is this? |
PROJECT NAME |
RomanS |
0.25 |
Middle Center |
TITLE |
What is the TITLE? |
TITLE |
RomanS |
0.25 |
Middle Center |
LOGO |
What are your INITIALS? |
ABC |
RomanD |
0.75 |
Middle Center |
PAPER |
What size paper are you using? |
A3 ( info) |
RomanS |
0.125 |
Middle Left |
FILENAME |
What is the drawing's FILENAME? |
C:/XXXXX.DWG |
RomanS |
0.125 |
Middle Left |
REVISION |
What REVISION is this? |
- |
RomanS |
0.125 |
MIddle Left |
SCALE |
What SCALE is this printed at? |
1"=XX" |
RomanS |
0.125 |
Middle Left |
DRAFTER |
WHO drew this? |
J. Smith |
RomanS |
0.125 |
Middle Left |
SHEET |
What SHEET is this? |
X / X |
RomanS |
0.125 |
Middle Left |
NOTE1 |
First NOTE |
Note |
RomanS |
0.1875 |
Middle Center |
NOTE2 |
Second Note |
Note 2 |
RomanS |
0.1875 |
Middle Center |
Once all you attributes are created, they should look something like this. You can always move them to get them in the correct spots.

Once all the attributes are in place, you can create your block. Remember when selecting attributes for a block, you have to select them order. Create it as an External block so that you can insert it in other drawing.
Now that you have a title block, you can go into a layout tab and insert it. Answer all the prompts when they come up (look at the command line). Your completed title block should look something like this:

You can now use this as a template for other size sheets, or for horizontal or portrait layouts. Just explode the block, draw the new border lines and re-create the block. For example, you may only have a printer that does 8-1/2 x 11 prints - so create a title block for that size. For more practice, you can create a second block for filling in the revision information at the top.
|