Now that you have learned how to draw objects
and modify them using special commands, you need to know more ways to change the properties of an object. For instance,
you may have made a spelling mistake in your text. You could
erase it and re-create it, or you could double-click on it and
just correct the error. Maybe you drew something on the wrong layer? This process is an extremely important
tool to help you with your CAD work.
DON'T REDRAW AN OBJECT - CHANGE ITS
PROPERTIES
There are a few ways to change, or view an objects
properties. First is by using the PROPERTIES command.
Command |
Keystroke |
Icon |
Location |
Result |
Properties |
PROPERTIES /
PR / CTRL+1 |
No Icon |
Home > Properties |
Displays the properties of the object in the Properties
Palette |
Match Properties |
MATCHPROP / MA
PAINTER |
 |
Home > Clipboard > Match Properties |
Copies the properties from one object to another |
The method is quite easy and also the most complete
way of viewing properties.
Draw a line from
(any point)
to (any
point) and press <ENTER>. This is only time I will not tell
you to use specific coordinates. :)
Now select the object by clicking on it and
pick the properties icon. Once you do this, you should see the
properties palette appear showing everything that makes that
line what it is.

What you see here is the complete palette. Before
you look at the properties, take a moment to examine the palette
itself. These are new to later versions of AutoCAD. Since it
takes up a large amount of the screen, you have the option to
either close it completely ('X' at the top) or collapse or hide
the palette (below the X) for future reference. You can also dock a palette to the side of the screen. Try the buttons out and then continue reading.
Now look at the properties as displayed in the
palette. At the top are the 'General' properties - these are common to all AutoCAD objects (they all have them). You will see that one endpoint of the line is shown as the
"Start X" and "Start Y" points (X,Y point). If you want
to change the location of the X coordinate for the Start point,
pick in the text area, type a number and press (ENTER). You
also have the option of picking new X coordinate with the small
icon shown above.
Have good look at the palette. Erase the
first line, draw another line and then display the new line's
properties. You should see different numbers.
Now erase the line and draw a circle. Display
the properties and you will see different fields. You will see
that the the Start X point has been changed to "Center X". The
properties displayed are specific to the object you have selected.
Now draw a line next to the circle. Select both
by clicking on one, and then the other. Now display the properties
by selecting the icon. You will now see a much short list of
properties. This short list will include properties that are
common to both objects, such as layer, color, etc.
Now try something different. Erase everything
and close the Properties palette. Draw a circle and then select
it. Right click on the screen and choose the Properties option
at the bottom of the list as shown below:

You'll see the same palette appear - in the same space where
you closed it. You also have the choice of selecting Quick Properties the same way. If you do, this is the smaller palette that you will see (handy on smaller monitors).

OTHER OBJECTS
By now you see how you can view and edit properties of objects
you have drawn. Those the methods will work on any object. But
what about other objects? Could there be easier ways to edit
their properties? You bet!
Enter a line of text like you did in the Lesson
1-8. View the properties like you did in the previous examples.
Note again, the various fields that in this case are unique to Text. Now try "Double-Clicking" on
the text.

Now you can change the text and press <ENTER> (then <ENTER> to end the command). This is
a much easier method to change the text's content,
but none of the other properties. You could also have changed the text
in the Properties palette, but this method is much quicker.
Changing Layers
Many times you will draw an object and find
that is on the wrong layer. To change an object's layer, you
can open the Properties palette (as shown above) or use this
easy tip.
Create a new LAYER (as you did in Lesson
1-8) and
call it LINES. Do not make it the current layer. Draw a line
on the 0 layer.
Now select the object and then move your cursor
up to the layer droplist. You'll see a list of all of your layers
- pick on the LINES layer - then press ESC.
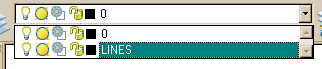
Now when you check the properties of the line,
you'll see that it is on the LINES layer. This is one method
you will be using a lot, so learn it and master it.
Match Properties
One of the easiest ways to set properties is to use the MATCH PROPERTIES command. This is used by starting the command (MA) and then selecting the source object (the one that has the desired properties) and then selecting the target object(s). Use can also select the source object first, then the icon and then the target object. The icon for this command is in the clipboard tool panel. And no, I don't know why it's not in the Properties panel.
Conclusion
You now have the skills to change to properties
of any object you draw. There are many ways of doing it, but
you'll see that some methods are easier. So remember, once something
is drawn, you can modify it as shown in the previous lessons
in this level, or modify the properties. In only rare instances,
is it easier to erase and redraw the object. As you learn more
commands in the next lessons, try these methods to see what can
be changed - and how.
There are other ways that will be shown in future
lessons in the next levels.
|

